How to Make Dubai Chocolate at Home
Learn to create authentic pistachio cream and kunafa-filled chocolate bars with this complete step-by-step guide
Dubai chocolate has taken the world by storm with its unique combination of rich chocolate, creamy pistachio filling, and crunchy kunafa pastry. Originally created in Dubai's luxury chocolate shops, you can now make these viral chocolate bars at home with the right ingredients and techniques.
The Dubai Chocolate Story
The viral Dubai chocolate trend started in the luxury chocolateries of Dubai, where master chocolatiers began experimenting with Middle Eastern flavors. The combination of premium chocolate with traditional ingredients like pistachios and kunafa (a crispy pastry used in Middle Eastern desserts) created an instant sensation.
What makes Dubai chocolate special isn't just the flavors—it's the textural contrast. The smooth, rich chocolate shell gives way to a creamy pistachio center studded with crunchy kunafa pieces, creating an unforgettable eating experience that explains why these bars can sell for $20+ each in luxury shops.
Why Make It at Home?
While authentic Dubai chocolate can cost upwards of $20 per bar, making it at home allows you to create the same luxury experience for a fraction of the cost. Plus, you can customize the sweetness, adjust the pistachio-to-kunafa ratio, and even experiment with your own flavor variations.
This comprehensive guide will walk you through every step of creating authentic Dubai chocolate bars, from tempering the chocolate to preparing the signature pistachio-kunafa filling. We'll also share where to find the best ingredients and professional techniques to ensure your homemade version rivals the original.
What You'll Learn in This Guide
- ✓ The science behind chocolate tempering and why it matters
- ✓ How to source authentic Middle Eastern ingredients
- ✓ Professional techniques for perfect chocolate molding
- ✓ Troubleshooting common chocolate-making problems
- ✓ Creative variations and flavor combinations
- ✓ Storage and gifting tips for perfect presentation
- ✓ Cost breakdown: save 70% compared to store-bought
- ✓ Equipment recommendations for every budget
Ingredients You'll Need
🎯 Ingredient Quality Matters
The secret to authentic Dubai chocolate lies in using premium ingredients. While you can make substitutions, investing in high-quality chocolate and authentic Middle Eastern ingredients will dramatically improve your results. Each ingredient plays a specific role in creating the perfect texture and flavor balance.
For the Chocolate Shell
-
Dark chocolate (70% cocoa) 400g
Forms the main structure. 70% cocoa provides the perfect balance of richness and workability for tempering.
-
Milk chocolate 200g
Adds creaminess and balances the intensity of dark chocolate. Creates the signature smooth finish.
💡 Pro Tip: Use couverture chocolate (Valrhona, Callebaut, or Guittard) for professional results. The higher cocoa butter content makes tempering easier and creates a better snap.
💰 Budget Option: Ghirardelli or Lindt chocolate chips work well for beginners, though the texture won't be quite as smooth.
For the Pistachio Filling
-
Pistachio paste 150g
The star ingredient. Look for 100% pure pistachio paste without added oils for the most authentic flavor.
-
Tahini (sesame paste) 100g
Adds creaminess and helps bind the filling. Use hulled tahini for a milder flavor.
-
Powdered sugar 50g
Balances the nutty flavors and helps achieve the right consistency.
-
Kunafa pastry 100g
Provides the signature crunch. Available at Middle Eastern grocery stores or online.
-
Unsalted butter 2 tbsp
For toasting the kunafa to golden perfection.
🌟 Substitution Guide: Can't find kunafa? Try finely chopped phyllo pastry or even crushed cornflakes as alternatives, though the authentic texture will be different.
Cost Breakdown: Homemade vs Store-Bought
Homemade (12 bars)
- Premium chocolate $18.00
- Pistachio paste $12.00
- Tahini $4.00
- Kunafa pastry $3.00
- Other ingredients $2.00
- Total Cost $39.00
- Cost per bar $3.25
Store-Bought
- Luxury Dubai chocolate (1 bar) $20-25
- Online premium brands (1 bar) $15-18
- Artisan chocolate shops (1 bar) $12-15
- Average per bar $16.00
💰 Save 80% by making at home!
Plus you get 12 bars instead of just 1
Essential Tools & Equipment
🔧 Equipment Investment Guide
While you can make Dubai chocolate with basic kitchen tools, investing in proper equipment will dramatically improve your results and make the process much easier. We've organized tools by priority level to help you decide what to buy first.
Must-Have Equipment
Chocolate Bar Molds
Professional polycarbonate molds create the perfect shape and glossy finish. Standard bar size is 100g (3.5 oz).
• Polycarbonate for best results
• Easy release and cleaning
• Creates professional appearance
Digital Thermometer
Instant-read thermometer is absolutely essential for proper chocolate tempering. Accuracy within 1°F is crucial.
• Fast 2-3 second readings
• Accurate to ±1°F
• Easy to clean probe
Silicone Spatulas
Heat-resistant spatulas for stirring chocolate during tempering. Silicone won't scratch bowls or retain flavors.
• Heat resistant to 500°F
• Flexible for scraping bowls
• Set of 2-3 different sizes
Nice-to-Have Equipment
Double Boiler
For gentle, controlled chocolate melting
While you can use a heatproof bowl over simmering water, a proper double boiler gives more consistent results and better temperature control.
Digital Kitchen Scale
For precise ingredient measurements
Chocolate making requires precision. A scale that measures to the gram will give you much more consistent results than volume measurements.
Budget vs Premium Equipment
| Equipment | Budget Option | Premium Option | Difference |
|---|---|---|---|
| Chocolate Molds | Silicone molds ($8-12) | Polycarbonate ($25-40) | Better release, glossier finish |
| Thermometer | Basic digital ($10-15) | Professional ($30-50) | Faster, more accurate readings |
| Spatulas | Basic silicone ($5-8) | Professional set ($15-25) | Better heat resistance, durability |
💡 Beginner Recommendation
Start with budget options to learn the process, then upgrade to premium equipment once you're confident in your technique. Total starter cost: $25-35.
🏆 Pro Setup
If you plan to make chocolate regularly or as gifts, invest in premium equipment from the start. The results justify the cost. Total pro cost: $80-120.
Step-by-Step Instructions
Prepare the Kunafa Filling
Understanding Kunafa
Kunafa (also spelled knafeh or kadayif) is a traditional Middle Eastern pastry made from thin, noodle-like strands of dough. It's what gives Dubai chocolate its signature crunch and authentic flavor profile. The key is achieving the perfect texture - crispy and golden, not soggy or burnt.
Step-by-Step Process
-
1
Break apart the kunafa: Remove kunafa from packaging and gently separate the strands. If frozen, let thaw for 10-15 minutes. Break into roughly ½-inch pieces using your hands or kitchen shears.
-
2
Heat the butter: In a large, heavy-bottomed pan, melt 2 tablespoons of unsalted butter over medium heat. The pan should be large enough to spread kunafa in a single layer.
-
3
Toast the kunafa: Add kunafa pieces to the pan and stir constantly for 5-7 minutes. You'll hear it sizzling - this is good! The color should change from pale to golden brown.
-
4
Cool completely: Transfer to a plate and spread in a single layer. Let cool for at least 15 minutes until completely crisp. This step is crucial - warm kunafa will make your filling soggy.
💡 Pro Tip: The kunafa should sound crispy when you tap it with a spoon. If it's still soft, toast for another 1-2 minutes.
⚠️ Watch Carefully: Kunafa can go from golden to burnt quickly. Stir constantly and remove from heat as soon as it's golden.
🛒 Where to Buy Kunafa
- • Middle Eastern grocery stores (fresh or frozen section)
- • Amazon or online specialty food retailers
- • Some Whole Foods locations carry it
- • Turkish or Lebanese markets
Make the Pistachio Cream
The Heart of Dubai Chocolate
The pistachio cream is what makes Dubai chocolate so special. This isn't just ground pistachios - it's a carefully balanced mixture that creates the perfect creamy, nutty center. The combination of pistachio paste and tahini creates a luxurious texture that's both rich and smooth.
Detailed Mixing Process
-
1
Start with pistachio paste: Place 150g of high-quality pistachio paste in a medium mixing bowl. If it's very thick, let it come to room temperature for easier mixing (about 15-20 minutes).
-
2
Add tahini gradually: Add 100g of tahini (sesame paste) one tablespoon at a time, mixing well after each addition. This prevents the mixture from becoming too loose too quickly.
-
3
Sweeten to taste: Sift in 50g of powdered sugar and mix thoroughly. Taste and adjust - you want it sweet but not overpowering the pistachio flavor.
-
4
Achieve perfect consistency: Mix for 2-3 minutes until completely smooth. The mixture should be spreadable like thick peanut butter - not too stiff, not too runny.
-
5
Fold in kunafa: Gently fold in the cooled, crispy kunafa pieces. Don't overmix - you want to maintain the crunch while distributing evenly.
Texture Check
Perfect consistency indicators:
- ✅ Holds its shape when spooned
- ✅ Spreads easily without tearing
- ✅ No oil separation visible
- ✅ Kunafa pieces are evenly distributed
- ✅ Rich pistachio color throughout
🥄 Pro Tip: Taste and adjust sweetness as needed. Some pistachio pastes are naturally sweeter than others.
🌡️ Temperature Tip: If mixture is too thick, warm it slightly. If too thin, chill for 15 minutes.
🥜 Pistachio Paste Quality Guide
Best: 100% pure pistachio paste (no added oils or sugar)
Good: Pistachio butter with minimal additives
Avoid: Pistachio spreads with lots of sugar or palm oil
Brands to try: Joyva, Al Wadi, or make your own from raw pistachios
Temper the Chocolate
Why Tempering Matters
Tempering is the most technical part of making Dubai chocolate, but it's what separates homemade bars from professional ones. Properly tempered chocolate has a glossy finish, satisfying snap, and won't develop white spots (bloom). It's all about controlling the crystal structure of cocoa butter.
The Science Behind Tempering
Cocoa butter can form 6 different crystal types (polymorphs). We want Form V crystals, which create stable, shiny chocolate. The heating and cooling process encourages the right crystals to form while preventing the wrong ones.
Step-by-Step Tempering Process
-
1
Prepare your chocolate: Finely chop 600g total chocolate (400g dark + 200g milk) with a sharp knife. Uniform pieces melt more evenly. Set aside 200g (1/3) for seeding later.
-
2
Melt 2/3 of chocolate: Place 400g chopped chocolate in a double boiler. Heat gently, stirring frequently, until it reaches 115°F (46°C) for dark chocolate or 110°F (43°C) for milk chocolate. This destroys all crystal forms.
-
3
Cool with seeding: Remove from heat. Add remaining 200g chopped chocolate gradually, stirring constantly. This "seeds" the mixture with stable crystals. Stir until temperature drops to 84°F (29°C).
-
4
Reheat slightly: Gently reheat to working temperature: 88°F (31°C) for dark chocolate or 86°F (30°C) for milk chocolate. This melts unstable crystals while keeping good ones.
-
5
Test the temper: Dip a knife tip in chocolate and set aside for 3 minutes. Properly tempered chocolate will be glossy and firm, not streaky or soft.
Temperature Reference Chart
| Chocolate Type | Melt To | Cool To | Working Temp |
|---|---|---|---|
| Dark (70%+) | 115°F (46°C) | 84°F (29°C) | 88°F (31°C) |
| Milk Chocolate | 110°F (43°C) | 84°F (29°C) | 86°F (30°C) |
🌡️ Critical: Temperature control is essential. Use a digital thermometer accurate to ±1°F for best results.
⏰ Timing: Work quickly once tempered. Chocolate stays in temper for about 20-30 minutes at room temperature.
🚨 Troubleshooting Temper Issues
Chocolate won't set: Temperature too high - let cool and try again
Streaky finish: Not properly tempered - start over with fresh chocolate
White spots later: Temperature fluctuations during storage
Soft texture: Under-tempered - reheat and cool again
Assemble the Chocolate Bars
The Art of Professional Assembly
This is where your Dubai chocolate bars come together. The key is working quickly but carefully - your tempered chocolate won't wait! Professional chocolatiers use a three-layer technique that ensures the filling stays centered and the bars have clean, sharp edges.
Detailed Assembly Process
-
1
Prepare your workspace: Have molds clean and at room temperature. Set up your pistachio filling with a small spoon nearby. Work in a cool room (below 70°F/21°C) if possible.
-
2
Create the base layer: Pour tempered chocolate into each mold cavity, filling about 1/3 full. Use a spoon to ensure even distribution. The chocolate should coat the bottom and start up the sides slightly.
-
3
Remove air bubbles: Tap the mold firmly on your counter 10-15 times. You'll see bubbles rise to the surface. This step is crucial for a smooth finish.
-
4
Add the pistachio filling: Place about 1 tablespoon of pistachio-kunafa mixture in the center of each cavity. Leave at least 3mm border around all edges - this prevents filling from leaking out.
-
5
Seal with chocolate: Pour more tempered chocolate over the filling, completely covering it. Fill to the top of the mold. The chocolate should flow around the filling and seal the edges.
-
6
Final tapping and leveling: Tap mold again to remove air bubbles. Use a bench scraper or knife to level the surface, removing excess chocolate. The surface should be perfectly flat.
Professional Techniques
🎯 Filling Placement
- • Center the filling precisely
- • Don't overfill - less is more
- • Keep filling away from edges
- • Press gently to settle
🔧 Mold Management
- • Work with 2-3 molds at a time
- • Keep unused chocolate warm
- • Clean spills immediately
- • Check temperature frequently
✨ Pro Secret: Chill molds for 2-3 minutes between layers. This creates cleaner layer separation and prevents mixing.
⚡ Speed Tip: Have everything ready before you start. Tempered chocolate waits for no one!
🚨 Common Assembly Mistakes
Filling leaks out: Too much filling or placed too close to edges
Air bubbles in bars: Insufficient tapping or chocolate too thick
Uneven thickness: Not leveling the surface properly
Chocolate seizes: Water contamination - keep everything dry
Set, Unmold & Perfect Your Bars
The Final Transformation
This final step is where the magic happens - your liquid chocolate transforms into beautiful, professional-looking bars. Proper setting and unmolding technique will determine whether your bars have that perfect snap and glossy finish that makes Dubai chocolate so special.
Setting Process
-
1
Initial room temperature set: Let molds sit at room temperature for 5-10 minutes first. This allows the chocolate to begin setting properly and prevents thermal shock.
-
2
Refrigerate carefully: Place molds in refrigerator (not freezer) for 20-30 minutes. The chocolate should feel firm to touch and have a matte finish when ready.
-
3
Check for contraction: Properly set chocolate will have pulled away slightly from the mold edges. You should see a small gap around the perimeter of each bar.
-
4
Test readiness: Gently press the back of the mold - the chocolate should feel solid, not soft or flexible. If still soft, refrigerate for another 10 minutes.
Professional Unmolding Technique
-
1
Return to room temperature: Remove from fridge and let sit for 2-3 minutes. This prevents condensation and makes unmolding easier.
-
2
Invert the mold: Turn mold upside down over a clean surface or parchment paper. Hold firmly with both hands.
-
3
Gentle release technique: Tap the mold gently but firmly on the counter. The bars should drop out easily. If they stick, refrigerate for another 5 minutes.
-
4
Handle with care: Use clean hands or food-safe gloves to handle bars. Fingerprints will show on the glossy surface.
Quality Check
Perfect Dubai chocolate bars should have:
- ✅ Glossy, mirror-like surface
- ✅ Sharp, clean edges
- ✅ Audible "snap" when broken
- ✅ No white spots or streaks
- ✅ Even thickness throughout
- ✅ Filling centered and contained
- ✅ Rich chocolate aroma
- ✅ Smooth, unblemished back
Storage & Serving Guide
📦 Proper Storage
- • Cool, dry place (60-68°F)
- • Airtight container
- • Away from strong odors
- • Never refrigerate after unmolding
- • Consume within 2 weeks
🍽️ Serving Tips
- • Serve at room temperature
- • Let warm for 5-10 minutes if cold
- • Cut with sharp knife if sharing
- • Pair with coffee or tea
- • Present on elegant plate
🎁 Gift Wrapping: Wrap individual bars in gold foil or parchment paper for elegant presentation.
📸 Photo Tips: Natural lighting shows the glossy finish best. Avoid flash photography.
🎉 Congratulations! Your Homemade Dubai Chocolate is Ready!
You've just created luxury chocolate bars that rival those from Dubai's finest chocolatiers. Each bar represents hours of careful work and attention to detail. Enjoy the fruits of your labor - you've earned it!
🚨 Troubleshooting Final Issues
Bars won't release: Chocolate not fully set - refrigerate longer
Dull finish: Chocolate out of temper or mold not clean
Cracked bars: Temperature change too rapid - gradual cooling needed
Soft texture: Under-tempered chocolate or too warm storage
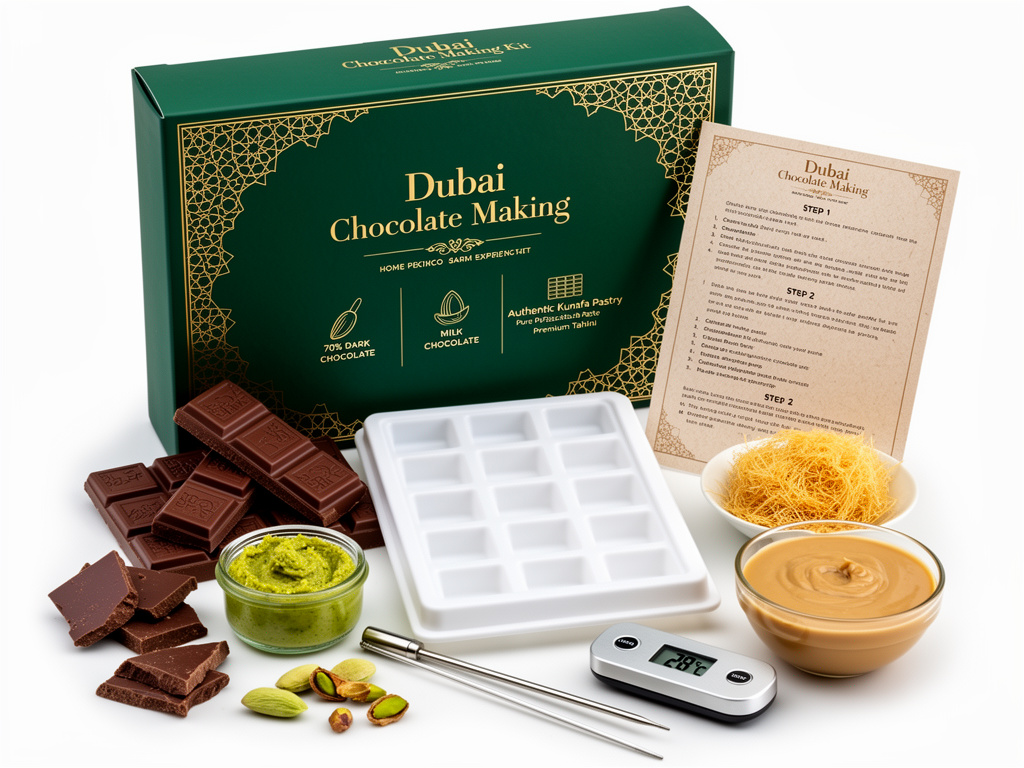
Dubai Chocolate Making Kit
Everything you need to make authentic Dubai chocolate at home. Skip the ingredient hunt and start creating delicious chocolate bars today.
What's Included:
- ✓ Premium 70% Dark Chocolate (400g)
- ✓ Milk Chocolate (200g)
- ✓ Pure Pistachio Paste (150g)
- ✓ Authentic Kunafa Pastry (100g)
- ✓ Premium Tahini (100g)
- ✓ Professional Chocolate Bar Mold
- ✓ Digital Thermometer
- ✓ Step-by-Step Recipe Card
Free shipping on orders over $50
Makes 12 chocolate bars • Perfect for beginners
Pro Tips & Troubleshooting
✅ Success Tips
- • Use room temperature ingredients for smooth mixing
- • Work in a cool, dry environment (below 70°F/21°C)
- • Clean all equipment thoroughly - any water will seize chocolate
- • Practice tempering with small batches first
🔧 Common Issues
🎯 Variations to Try
- • Add rose water to pistachio cream for floral notes
- • Mix in chopped dates for extra Middle Eastern flavor
- • Use white chocolate for a different color profile
- • Sprinkle sea salt on top before setting
📦 Storage & Gifting
- • Store in airtight container at room temperature
- • Avoid refrigerator - causes condensation
- • Wrap individually in foil for gifts
- • Best consumed within 2 weeks